So this afternoon I took apart a couple of freehubs and removed the pawls that keep them from spinning in both directions. It was, to say the least, an adventure.
If you don't know what a bicycle freehub is it's like a bicycle freewheel only different. As with many things
Wikipedia has a fairly good explanation. The key thing about a freehub for my purposes is that if you take out the pawls that normally only allow it to spin freely in one direction so you can pedal and make the rear wheel spin then the freehub will happily spin in both directions independent of the bicycle wheel and bicycle wheel axel! A freehub modified in this fashion can be used to create a mid-drive gear cluster for a bicycle and/or work as the central pivot element in a bicycle suspension. Thus my interest and today's effort.
Most freehubs are not meant to be dissembled and serviced. As a consequence doing so is something of a challenge. The first problem is that most freehubs require a special tool to actually dissemble the freehub. Shimano used to sell such a took, part # FH-40, but stopped several years ago. If you want your freehub serviced Shimano says send it back to the factory. Most people just buy a replacement.
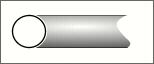
The part of the freehub that matters looks like this:
There is a slot about 1 1/8" wide that needs to be unscrewed. To do so I had to fabricate a tool. My first effort was to use a piece of strapping ground to fit. Didn't work since the part is on VERY tight and the steel was so mild that it simply bent.
 |
| Strapping just bent. Need something with harder steel. |
I went to Home Depot and bought a 1 1/8" mason's chisel. Ground down this actually fit better than the strapping. It worked well and both freehubs were soon apart.
One of the freehubs was an actual Shimano part. The pawls were quickly removed and the 52 1/8" bearings put back with only a small amount of fuss. The other was a Shimano knock off. I ended up spending almost 2 hours getting it back together as the assembly was a bit different.
Now I have two modified freehubs that I may be able to use.
Next step is to look into sprockets since there is a bit of mischief there.
===============================
A bit of searching found this
Swedish page with lots of photos and a good explanation. Don't you just love Google translate! The original post the author used is no more so I've copied the English translation here for posterity.
Be ready to acquire 50 pc stock of balls of size 1 / 8 ". One can of course re-use the old, but when you're at it, it is better to get fresh. It is also quite time-consuming to wash as little balls, and a few happen to disappear when picking apart bodysuits, it is not the whole world.
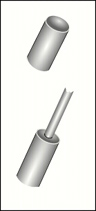
You will also need a special tool. It can be done quite easily by a piece of sheet metal of rather stiff quality. It should be 29 mm wide and 2 mm thick. An alternative is to take a sleeve with an outer diameter of 29 mm and grind down so that you have two splines. Splines should be 2 mm wide. The height, I remember not really, but 4 mm should work.
The first thing to do is obviously to pick the cassette, and then remove the shaft and bearings in the usual way.
Feel now the bodysuits. Too much play it? If so, a stock adjustment should be a little tighter.
Carefully bend the dust cover from the bodysuits. It is easier said than done. This is actually the most difficult part when you do-body service, how ridiculous it may sound. If you deform it may be possible to shape it back, but it all depends on how badly damaged it is. Suitable tool to pry becomes somewhat flat as you have at hand, such as a screwdriver.
 Loosen the bolt holding the bodysuits at the hub a few times with a 10mm Allen wrench.
 Pick up the special tool, which can look like this
 Do you have access to the vise so tighten it like this
 The bodysuits are a storage tray with two tracks. Add wheel with bodysuits to the tool and fit into the grooves.
 Press the wheel against the tool and pull it clockwise, until you feel that Dish released.
 Pick of bodysuits from the hub by unscrewing the bolt that holds it.
 Set bodysuits in a nice clean workspace and take up the special tool again. Hold bodysuits firmly against the surface and unscrew the bearing shell with a special tool. Make sure not to lift the bodysuits. Tip: do this operation on a cover with edges.
 The lifting of the spline outer part of the bodysuits. Now it drops balls.
 Now you have come so far that the bodysuits are in four parts, from left outer splines, then the inner part with spring heels and then the bearing shell. Bearing shell bottom is lagerkona for one layer in bodysuits. In the background is 50 retired stock balls, and oil to lubricate your mood.
 The two lugs on the inner part is held in place by a spring. Pick of the spring with a small screwdriver.
 Here's how it looks when everything is picked apart. The three rings left on the outer part is the shim that is used to adjust the stock voltage of the bodysuits. To the right of bearing shell shows an O-ring. The seal between the inner part and outer part of the bodysuits.
 Clean all parts. As you clean it in a long discussion that can be taken at any other time, so I say short you should use your favorite detergent.
 Now that everything is clean and tidy so, replace the knobs on the inner part and attach the spring on them.
 Take care not to want to lick the inner part.
 Attach the O-ring seal between the inner and ytterdeln at the bottom of the inner part. In the bottom of the inner part is a race. Apply grease to it and push it 25 fresh new layer balls. A forceps can be useful for this. Is Ville at hand so let him do the job for you. The reason for the deletion of grease on the bearing race is for the balls to stick.
 Once this is done it is time to put together the inner and outer. Slip on the outer part of the inner part. The outer part may need to be twisted so that the inner unit heels pressed and not receiving.
 Add oil in bodysuits. What to wear for the lubricant is of course not to get an exact answer because you should not serve bodysuits, but what I have read on other forums is that oil is recommended rather than fat. The oil should be fairly thick. I happened to have 75W gear oil portrait so that was what I used. Regular motor oil works safely even there. I filled the oil so that it covered up to the edge of the inner part.
 Plain fat will apparently not be a big shot, then it can make that heels did not spring out and grab it and thus do not get any traction in bodysuits. A wild guess is that a very thin fat such as Manitou Prep-M would work well. If you use fat as fat is naturally in the inner part and the inside of the outer part before reassembling them.
Apply grease to the underside of the bearing shell, the acting lagerkona in frihjulslagret. Press the remaining 25 stocks balls.
Plain fat will apparently not be a big shot, then it can make that heels did not spring out and grab it and thus do not get any traction in bodysuits. A wild guess is that a very thin fat such as Manitou Prep-M would work well. If you use fat as fat is naturally in the inner part and the inside of the outer part before reassembling them.
Apply grease to the underside of the bearing shell, the acting lagerkona in frihjulslagret. Press the remaining 25 stocks balls.
 Carefully lift the bearing shell in bodysuits and fix it. Now we need a steady hand. Once in place properly, tighten the bearing shell with a special tool. You tighten counterclockwise.
 But this is how it's not like? No, just that. Of course, the correct number of shims inserted between the inner layer and toast before the latter is put in place. If bodysuits loose before you picked it apart, you can remove a shim so will stock the tension a bit tighter. Just to tear in other words ...
 Were you grumpy now? Take a pizza break, you should not screw hungry.
 This is how it should look like, no shims over.
 Replace the bodysuits at the hub.

 Screw the bolt that secures the bodysuits at the hub, and tighten it lightly.
 Take special tool and tighten the bearing shell tightly. Then pull the bolt.
Done! So at the dust cover. I prefer to attach the dust cap after I grease the bearing cup and put the balls in the bearing in the hub.
If the dust cover is not reusable, I know, unfortunately, not exactly what you do. I have no idea if it is available as spare parts from Shimano. There are American companies that sell dust caps can be removed. It can go to buy dust caps from an industrial supplier, if you look a bit. Then you can surely find other solutions to seal well. The next time I serve a body, I will try to find a better solution to the seal. If I do, I will return.
* One should never throw things - they can be good to have *
Edited 7 times. Last changed 2005-11-23 01:23 by oxr.
Take special tool and tighten the bearing shell tightly. Then pull the bolt.
Done! So at the dust cover. I prefer to attach the dust cap after I grease the bearing cup and put the balls in the bearing in the hub.
If the dust cover is not reusable, I know, unfortunately, not exactly what you do. I have no idea if it is available as spare parts from Shimano. There are American companies that sell dust caps can be removed. It can go to buy dust caps from an industrial supplier, if you look a bit. Then you can surely find other solutions to seal well. The next time I serve a body, I will try to find a better solution to the seal. If I do, I will return.
* One should never throw things - they can be good to have *
Edited 7 times. Last changed 2005-11-23 01:23 by oxr.
 Acton Arboretum Treasure Hunt
  Where's the falls?